|
Printer friendly format
If you own an injected 308, a 328 or a Mondial (non-T), your car gets its fuel through a relatively simple mechanical injection system made by Bosch. (Here is a reference on how it works, if you are curious). The system essentially pushes a steady stream of fuel through the injectors mounted in the intake manifolds anytime the car is running or cranking to start. The injectors are always spraying fuel, unlike electronic injection where the injectors shoot little "spurts" of fuel on demand. To work, they have a little spring inside the injector, and a spray tip. When the fuel pressure inside the injector reaches about 3.5 bar (around 50 psi) it overcomes the spring pressure and fuel squirts out. The nozzle is designed to make a fine mist to aerosolize the fuel. Think of a Windex bottle turned to "spray" mode (not "stream" mode!) When your injectors get clogged up, several things can happen. Most common, is they stop opening at the right pressure. The spray pattern becomes "stream-like" (again, imagine the windex bottle, but this time on stream....not doing a lot of aerosolizing) and the other thing that can happen is that the nozzle sticks open a little, so it dribbles when it shouldn't. These issues have various symptoms. When they drizzle, it causes "run-on" (the car hiccups a few times as it continues to try running after you turn the key off). When the spray pattern is "streamy," you get bad fuel economy and poor combustion (and high emissions....cars can have a tough time passing emissions in this condition). When they open at too high a pressure, the car runs lean. You may not have noticed the gradual degradation of your Ferrari's performance because it happens slowly, but one day you may decide that something doesn't seem as peppy as it once was, and it's time to clean your injectors. The first step in cleaning your injectors is to remove them. This step should be easy, but it might not be. To explain why, I need to back up a little and show you an injector which is disassembled.
The above shot shows the three pieces of an injector assembly. You have the injector itself (long skinny thing), the threaded piece that holds it in the manifold (cylindrical aluminum piece which I am going to call the "carrier" for lack of a better word) and the rubber seal which goes between them. Inside the seal is a lip that goes in the groove on the shaft of the injector to make it air tight. (See next picture). The the injector/seal slides into the carrier. The hole in the top of the carrier is a hex cut-out so the 12mm hex part of the injector can pass through it.
Above: partially assembled injector.
Above: Assembled Injector
Above: Here is what the injector looks like installed. To get it out, first remove the fuel line (14mm flare nut) using either a 14mm a flare nut wrench if you have one or an open end wrench.
Now you ought to be able to put a 12mm wrench or socket on the injector itself and remove the whole threaded carrier from the manifold because the injector is seated in the hex-cutout of the carrier and the injector should turn the whole assembly. Should is the operative word. Only it almost never works out that way because of several things: 1. The carrier is stuck like nobody's business in the
manifold.
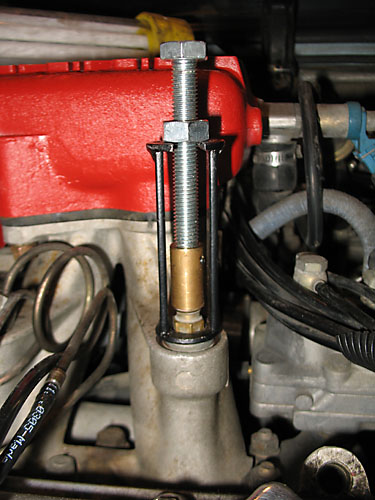
So what actually happens is you put a wrench on that injector and as soon as you put a little torque on it...the injector just spins within the carrier. What you need to do now is pull the injector straight out. (Remember, only the lip in the seal seated in the groove in the injector actually holds it in.) To do that, you need a puller. (You can buy one from Verell ).
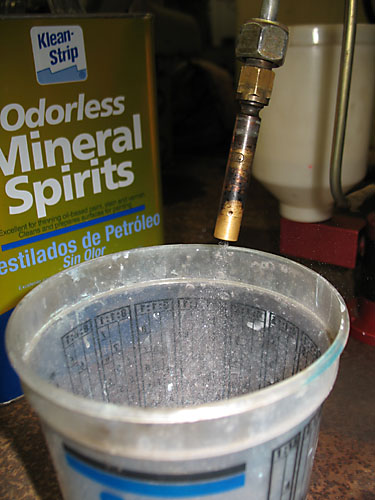
You thread the injector puller onto the injector, then just tighten the nut on the top while holding the bolt from turning with another wrench and voila! It pulls the injector right out. The picture above show it in action. Next you get a 12mm Allen socket, put it on a breaker bar, stick it in the carrier and pop that carrier loose. Pull the seal out of the carrier and you are disassembled. (It is recommended that you replace the seals. They are around $12 each and available from Ricambi.) The next thing to do is take them to be tested. In my case, my friend David Castelhano has the cool Bosch injector tester. It's a pump with a fuel line on it and a reservoir to fill with solvent (mineral spirits) along with a pressure gauge. You install an injector on the fuel line and put a cup under it to catch the solvent. Now pump the pressure up and see if the thing opens at the right pressure. Mine all opened way too high (4 bar+) and then when they did open, I got these nasty streams of solvent, not a nice aerosol. Not good! Well, keep pumping....and soon the solvent does its job, removing the crud, and within a dozen more pumps of the handle, a nice aerosolized squirt along with the characteristic chirping sound the injector makes when the thing is working right. It's actually really fun!
The next part of the test is to pump the pressure up to just under 3.5 bars, making sure it doesn't open too soon, then closing the valve on the gauge to do a pressure test. You let it sit for 90 seconds to be sure the pressure holds. This insures no dribbles. The injector should open at 3.5 bars, not 2.5 and not 4. It should hold 3 bars with no loss of pressure for a few minutes, then open at 3.5 and squirt. Once you have done all 8 injectors, cycle them through again. I actually had one that stuck a little again even after being cleaned the first time. What do you do if I don't have access to a tester/cleaner unit? Well, you can mail them to David and he can clean them. You can also buy new injectors for $20 each from here. (I'm pretty sure those are the right ones, but double check because I'm not 100% certain!) This might be the easiest way to do it but more expensive than cleaning perfectly good injectors. It's really cool to clean them and see them go from dirty to clean and know how crappy they were and how much better they are now. Now you can put them back in the car. This is easy. 1. Install the seal on the injector (use a little silicone spray to make them slide together easily. 2. Now push the injector/seal combo into the carrier. 3. Put high temp anti-seize on the carrier threads so you can get the damn thing apart in a couple years when you do this again. (You will thank yourself later!) 4. Thread the carrier back into the manifold and tighten the injector. You should not torque them down too hard. Let me say that again: take it easy on the torque! They aren't lug nuts! Don't get any dirt into the nice clean injectors while installing them. Now hook up the fuel lines. Start it, check for leaks in the lines, and go drive. Hey wait a minute, now my car won't start!! It's true, if you get air in the lines and injectors, sometimes the thing can crank a long time and not get the pressure to blow out the air and run. Here's what you do.
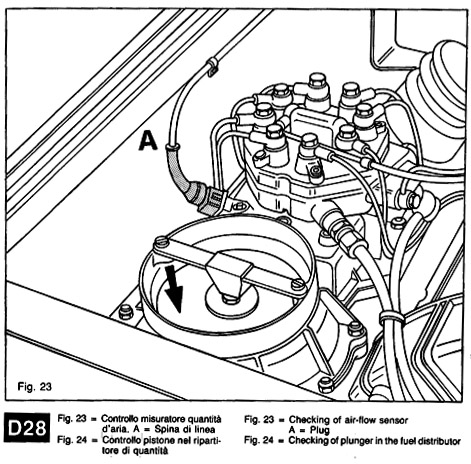
Behind the fuel distributor there is a connector that connects to the switch on the flow plate inside the fuel distributor. This switch prevents the fuel pump from coming on unless the car is running or cranking over. Pull the electrical connector off the fuel distributor (marked A in the diagram above). Now when you turn on the ignition, you will hear the fuel pump. (Don't try to start the car, just turn on the ignition switch to the first position). Let the pump run for 30 seconds and build up fuel pressure. Now gently push down a little on the flow plate in the fuel distributor (see the arrow in the diagram above). You will need to pull off the airbox to get at the flow plate. This pushes fuel to the injectors. Do not push it for too long or too much. You can severely flood the engine. David says that his technique is to crack open the fuel lines a tad at the injectors and let the air bleed out. I found that it was not necessary...the fuel pump would push the air out the injectors when I pushed on the flow plate. When I heard one of the injectors start to make that "injector sound" (you heard it when cleaning them), you know there is fuel in there. Now turn off the ignition switch, put the connector back on the fuel distributor, replace the airbox and star the car. It should start fine but may take a minute to run well as all the injectors get bled out. physically check all the injectors to be sure that the lines are not leaking fuel at the injector union. Remember that these things operate at 50+ PSI. Ta da! Now take it for a spin. I'll bet it runs a lot better! Below is some information from the service manual on bypasing the safety lockout on the fuel distributor.
Birdman
|