|
|
|
|
|
|
|
DISCLAIMER AND CREDIT WHERE DUE: 1. Disconnect everything • All electrical connections to the engine (battery, starter, wiring harness connections for gauges & ignition modules, engine ground strap from transaxle to frame, etc.) Now the engine should look something like this:
2. Wrap a tow strap around the front bank as shown:
When you lift the engine from the front bank like this, it will naturally rock into the perfect position as you lift so that it comes out of the car. It's very important to cover the roof and rear window so you don't bump into it and dent/break anything as the engine comes out. Getting the strap positioned right so the engine stays level with the floor (doesn't tilt left or right) is important otherwise you will have issues with it catching on the frame. So the engine will rock towards the rear when you pick it up by the front bank (this is desired) but make sure it doesn't tilt left or right. Note in this picture how the engine is lifting up from the front as the engine is lifted by the front bank. No levelers, nothing fancy. Just a strong strap and an engine hoist.
Another angle of the same thing:
You can stabilize the engine with one finger! Note how the engine has rocked backwards so the differential is hanging down but the whole thing is level from left to right. This is the perfect position. 3 Putting it back in! Before you put the engine in the car, place the front exhaust manifold in the engine bay as pictured here. That sucker is pretty much impossible to put in place once the engine is in. So you place it in the engine bay, drop the engine back in, then bolt the header up.
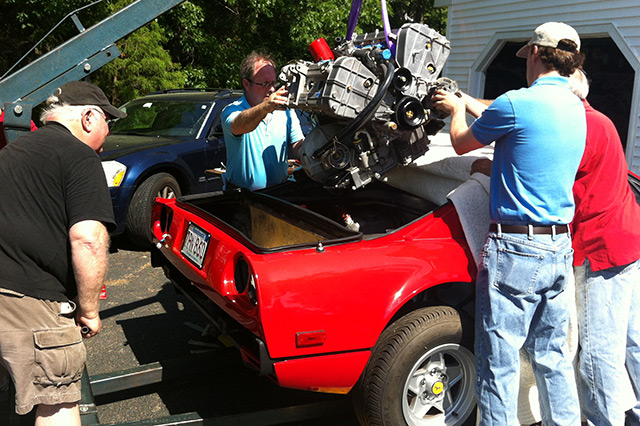
A few more sample images....here's our FFIC gang (David, blue shirt, holding the engine and directing the procedure) putting Fireman's engine back in. This is a carb car. Notice that the carbs are off but nearly everything else is installed and ready to go including the bell housing.
With Verell (left) running the hoist, we drop the engine right down into the car. Note how the rear window is covered along with the roof and sail panels. We truly can put the engine in the car in 5 minutes. It takes longer to set up the engine hoist than to put the engine in.
That's pretty much it. It's actually not that bad at all. A few additional pointers: • As a general rule you are going to need a pretty big garage to do this indoors, with a ceiling at least 10 feet high and a lot of space to roll the hoist around once the engine is hanging from it in order to get it away from the car. You may find that doing this job out in the driveway is easier if you have a paved driveway to work in. • Regarding the engine mount spacers--make a note as to which are front and back and the orientation (top to bottom) of the spacers. It's very easy to invert the front ones that are mushroom shaped. The wider end goes toward engine and smaller end goes on frame. • Another tip from Fireman regarding the engine mount spacers: It's probably easier to lower the engine on the frame rails without the spacers in place. Then get a floor jack and lift the front, then back of the engine and put the spacers in and align the bolt holes. A tapered drift rod works good for this because you have to align 3 holes; the frame rail, spacer and motor mount. Alignment is fairly close, otherwise the bolt won't go in all the way. Having the engine just off the rails so you can "balance" it and make slight adjustments is the key. DISCLAIMER: I'm a shadetree mechanic at best. This information is for entertainment only! If you are not comfortable doing this kind of work, hire a professional! If you are a professional mechanic charging a customer to work on a 308 and using this website as a guide, you should be ashamed of yourself! |